Inhaltsverzeichnis
Single Sign-On using Admidio's User Accounts: SAML 2.0 and OpenID Connect
Starting with version 5.0, Admidio can be used as a central login system for other applications using Single Sign-On (SSO).
When a user signs in to a connected application, they are redirected to Admidio for authentication, and after successful login are redirected back to the appplication, where they are automatically signed in.
Users only need to log in to Admidio and can access other configured applications without entering their username and password again. The connected applications do not need to store or process the users' passwords themselves.
Admidio supports the two most widely used SSO protocols:
- SAML 2.01), an XML-based protocol
- OpenID Connect (OIDC)2), an authentication protocol based on OAuth 2.0
With both protocols, Admidio authenticates the user and provides the connected application with the information required to sign the user in. In SAML terminology, Admidio acts as an Identity Provider (IdP). In OpenID Connect, the corresponding term is OpenID Provider (OP).
The following sections describe the general configuration for both protocols using the following systems as examples:
 Nextcloud
  DokuWiki





Other systems like Prestashop do not provide any freely available SAML or OpenID plugin, only some very expensive commercial extensions.
All examples here use the domain https://admidio.demo.open-tools.net/ or https://admidio.local as Admidio domain and https://[appname].demo.open-tools.net/ or https://[appname].local for the client applications.
Setup overview for SAML 2.0
To set up a third-party web application to use single-sign-on through Admidio as a SAML 2.0 Identity Provider (so that other applications will use Admidio's user accounts for their logins), one has to take three steps:
-
- Enable SAML 2.0
- Choose a unique entityID for the whole Admidio installation (not client-specific, typically the URL of the Admidio installation)
- Save (a cryptographic key for signatures and encryption will be generated automatically )
- Configuration of the client app (Service Provider): Admidio will provide a link with all required metadata for clients to use (https://[ADMIDIO_URL]/modules/sso/index.php/saml/metadata).
- If the client supports it, paste the metadata URL into the client configuration
- Otherwise copy/enter the settings manually:
- Admidio URLs for Single-sign-on (SSO) and Single-Log-Out (SLO)
- Public key / certificate of the Admidio IdP.
- Choose a unique “Client ID” to identify the client to Admidio.
-
- Create a new SAML client in Admidio's SSO client administration (“Preferences” → “Single-Sign-On” → “Single-Sign On Client Administration”)
- Ideally, the client (“Service Provider”) will provide a link to xml metadata. Paste this URL and let Admidio automatically load the configuration.
- If not, manually copy/enter the Client ID, the URL where the user should be redirected after login (ACS URL) as well as an optional cryptographic certificate used by the client to sign messages.
- In many cases, the automatic setup via metadata will work, but it is possible to add further configuration, like profile data submitted or groups/role mapping, or whether messages are signed/encrypted.
This page will describe the generic setup of a Admidio and a SAML 2.0 client. It has been tested with several SAML-ready applications, and client-specific instructions are available at separate pages.
Setup overview for OpenID Connect
To set up a web application (the “Relying Party”=“RP”) for single-sign-on through Admidio as an OIDC Identity Provider (so that other applications will use Admidio's user accounts for their logins), one has to take three steps:
-
- Enable OIDC support in Admidio
- The issuer URL should be left empty in most cases, i.e. the URL of the Admidio installation will be used.
- A cryptographic key for signatures and encryption will be generated automatically if needed, there is no need to generate or select one manually (in the advanced settings)
- Save
provides a link to the discovery URL for automatic client setup (https://[ADMIDIO_URL]/modules/sso/index.php/oidc/.well-known/openid-configuration).
- If the client supports it, paste the discovery URL into the client configuration for automatic configuration
- Otherwise copy/enter the endpoint URLs from Admidio manually: authorization, token, userinfo an optionally logout URL
- Choose a unique “Client ID” to identify the client to Admidio.
- The client should provide you with a Redirect URI needed for Admidio's client configuration. Note it.
- Create a new OIDC client in Admidio's SSO client administration (“Preferences” → “Single-Sign-On” → “Single-Sign On Client Administration”)
- Paste the “Client ID” as given in the client app, and paste the Redirect URI given by the client.
- Admidio will show a “Client Secret”, which must be copied to the client's config.
- Many simple OIDC clients do not support PKCE. If you get an error message that the client requires PKCE, disable PKCE in Admidio's client configuration-
- Select which scopes (classes of information) should be allowed to be sent to the client, and optionally select and map Admidio's profile fields and groups to OpenID claims (individual pieces/fields of information)
- In contrast to SAML, OpenID does NOT provide any automatic configuration of the client using metadata3).
This page will describe the generic setup of a Admidio and an OpenID client. It has been tested with several OpenID-ready applications, and client-specific instructions are available at separate pages
How does Single-Sign-On work?
Traditional Log-In
 The default login process to an app (the “Service Provider”, i.e. SP) works with the following steps:
- User clicks on “Log In”
- The app determines whether the user has access: It displays a login form, checks the entered Username and Password (hash), and if they exist and match, makes the decision to grant access.
- the app now knows that the user has successfully logged in and creates an appropriate session to keep the user logged in.
Step 2 are done by the application in this case, but there is no technical requirement for this. In principle, the decision that a user has successfully logged in can be done by any trusted system. This is where single-sign-on hooks in: Rather than each app requesting and processing passwords, step 2 is delegated to a so-called identity provider (“idP”). That identity provider needs to be trusted, and it will take over the part of checking whether a user has access permissions (by e.g. entering a password or using a fingerprint, etc.).
Single-Sign-On with SAML 2.0 using an external Identity Provider (IdP)
There are two established technical protocols for Single-Sign-On: SAML 2.0 (XML-based, widely used by large-scale bussiness applications and e.g. Microsoft ADFS) and OpenID Connect (OIDC) (JSON-based using “Tokens”; used by many web / social apps like Google, Facebook, etc.).
SAML 2.0 is based on XML messages, and basically just outsources the login form and the resulting login success decision to the IdP. If login is successful, the IdP sends this information (together with the user name and optionally some further profile fields) as a cryptographically signed XML to the SAML client.
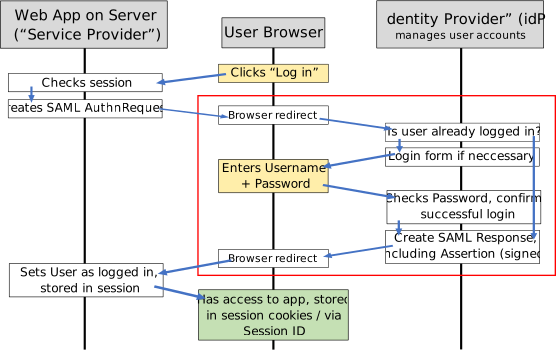 In the SAML case, the login flow above changes to the following. But but from a user perspective, the same steps of entering a password are done, just at a different system. The browser redirects involved in the flow, are hardly noticed by the user and don't require user interaction.
- User clicks on “Log In”
- The app does not determine user login itself. Instead it relies on a third party (the “Identity Provider”, short IdP) to determine whether a user has access:
- It creates an XML containing an XML “AuthnRequest” and redirects the browser to the IdP (Admidio in our case)
- If the user is not logged in to Admidio, it shows the login screen
- Admidio checks the login of the user (and whether the user is member of the permitted groups)
- If login is successful (or the user was already logged in), access should be granted. This is documented in XML data (the “Assertion”; cryptographically signed to prevent man-in-the-middle attacks) and sent back to the Service provider by a browser redirect.
- In addition to the username, the Assertion returned to the SP can also contain further user information (email, first/last name, etc.) and groups/roles.
- The client app (Service Provider) now knows that the user has successfully logged in to Admidio and creates an appropriate session to keep the user logged in.
There are some things to notice about the way SAML authentication works:
- All password handling and requesting is done by Admidio alone. The Service Provider (client app) never receives, asks or has to handle passwords.
- It is extremely important to ensure that the requests are really sent to the right system and the returned responses really originate from the authorized IdP. This can be assured by using public key cryptography, in particular by signing each request and response by private keys that ar only known to the SP and IdP, in turn. During initial set up, the corresponding certificates (signed public keys) need to be exchanged, which is the main part of setting up SSO (in addition to providing the URLs of the SP and IdP to each other).
- The IdP and the SP never communicate directly, only through the user's browser! As a consequence, the IdP and the SP can be in separate networks, e.g. the IdP can even be in a private network without access from the internet, as long as the user's browser can connect to it.
Single-Sign-On with OpenID Connect using an external Identity Provider (IdP)
OpenID Connect is based on exchanging data with JSON objects. It is an extension of the OAuth 2.0 protocol, which only handles authentication. The OpenID layer adds additional profile information and permissions, but uses OAuth for the basic authorization.
Rather than working only with browser redirects like SAML, OpenID is based on OAuth and extensively uses direct communication (“backchannel”) between the Relying Party and the IdP. Rather than documenting only a successful login, OpenID separates authentication (successfull login) and authorization (roles that grant user rights). It also does not rely on an active session at the IdP. Rather it generates a dedicated password (the “token”) for the client and thus replaces the user's individual password with app-specific passwords, which are handled internally by the client and the IdP without the user noticing. When such a token expires, another (refresh) token can be used to create a new token, so that no new login is required. All this is done in the background and the user experience is basically the same as with a direct login or with SAML.
todo box
Setting up SSO via SAML 2.0
A. Basic Setup for Admidio as a SAML ID Provider
Admidio's SSO configuration is done in the preferences (Tab “Sign in & Security”, section “Single-Sign-On”).
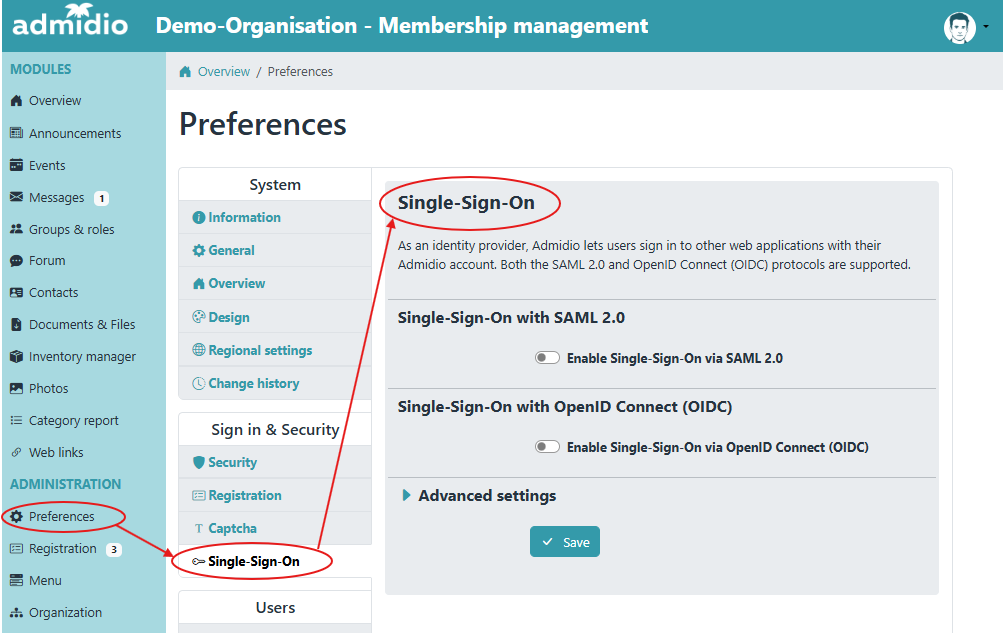
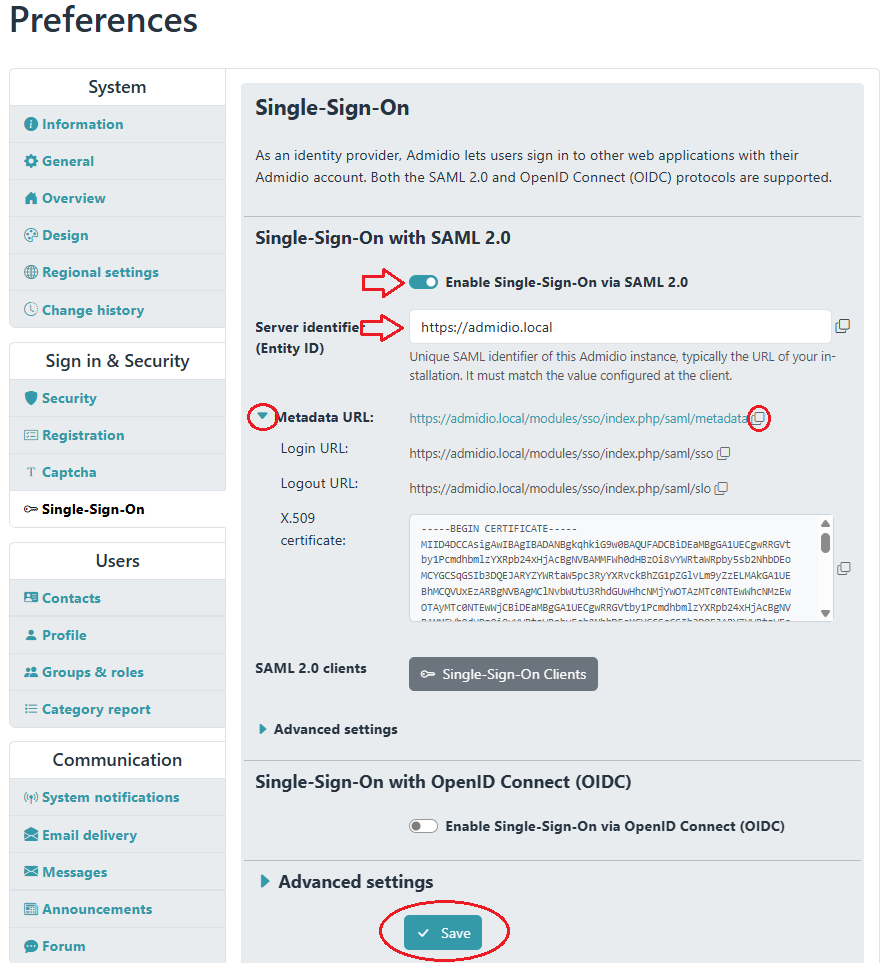
- First enable SAML 2.0 Single-Sign-on to show the SAML-specific settings
- SAML Entity ID: The URL of your installation (needs to be a unique ID, the URL is usually used, but some clients do not support colons or slashes in the ID)
- Save
The Preferences page also lists all the relevant data to set up the client as a Service Provider. If the client supports automatic setup from metadata, you can copy the metadata URL directly from this page and paste it in the client configuration. Use the “Copy” icon right of the URL.
The SSO settings also provide an advanced section, where you can select or generate crypto keys for the signatures and encryption of the SAML messages. A default key will be generated automatically.
Admidio is now ready to provide single-sign-on functionality to Service Providers.
Next Steps: Configure the client application for use with Admidio
Metadata file for automatic setup
That metadata URL provides all data to set up a client (SP) in XML format and can be automatically processed by the SAML client, if supported. Here is an example of such a metadata xml:
<EntityDescriptor xmlns="urn:oasis:names:tc:SAML:2.0:metadata" entityID="https://admidio.local" ID="_1df88e3a68af770dd23bf870b343990d38ce5c4cf0">
  <ds:Signature xmlns:ds="http://www.w3.org/2000/09/xmldsig#">
    <ds:SignedInfo>
      <ds:CanonicalizationMethod Algorithm="http://www.w3.org/2001/10/xml-exc-c14n#"/>
      <ds:SignatureMethod Algorithm="http://www.w3.org/2001/04/xmldsig-more#rsa-sha256"/>
      <ds:Reference URI="#_1df88e3a68af770dd23bf870b343990d38ce5c4cf0">
        <ds:Transforms>
          <ds:Transform Algorithm="http://www.w3.org/2000/09/xmldsig#enveloped-signature"/>
          <ds:Transform Algorithm="http://www.w3.org/2001/10/xml-exc-c14n#"/>
        </ds:Transforms>
        <ds:DigestMethod Algorithm="http://www.w3.org/2001/04/xmlenc#sha256"/>
        <ds:DigestValue>5ErkuUnL6eMZ0LnGvWGmZDrF/peW7b81WHQgFGCIB5A=</ds:DigestValue>
      </ds:Reference>
    </ds:SignedInfo>
    <ds:SignatureValue>BT1Rih/IZXn...8mSd0jg==</ds:SignatureValue>
    <ds:KeyInfo>
      <ds:X509Data>
        <ds:X509Certificate>MIID4DCCAsigAwIBA...MyLpVB5</ds:X509Certificate>
      </ds:X509Data>
    </ds:KeyInfo>
  </ds:Signature>
  <IDPSSODescriptor protocolSupportEnumeration="urn:oasis:names:tc:SAML:2.0:protocol" WantAuthnRequestsSigned="true">
    <KeyDescriptor use="signing">
      <ds:KeyInfo xmlns:ds="http://www.w3.org/2000/09/xmldsig#">
        <ds:X509Data>
          <ds:X509Certificate>MIID4DCCAsigAwIBA...MyLpVB5</ds:X509Certificate>
        </ds:X509Data>
      </ds:KeyInfo>
    </KeyDescriptor>
    <SingleLogoutService Binding="urn:oasis:names:tc:SAML:2.0:bindings:HTTP-Redirect" Location="https://admidio.local/modules/sso/index.php/saml/slo"/>
    <SingleLogoutService Binding="urn:oasis:names:tc:SAML:2.0:bindings:HTTP-POST" Location="https://admidio.local/modules/sso/index.php/saml/slo"/>
    <NameIDFormat>urn:oasis:names:tc:SAML:1.1:nameid-format:unspecified</NameIDFormat>
    <SingleSignOnService Binding="urn:oasis:names:tc:SAML:2.0:bindings:HTTP-Redirect" Location="https://admidio.local/modules/sso/index.php/saml/sso"/>
    <SingleSignOnService Binding="urn:oasis:names:tc:SAML:2.0:bindings:HTTP-POST" Location="https://admidio.local/modules/sso/index.php/saml/sso"/>
  </IDPSSODescriptor>
</EntityDescriptor>
Notice that it contains both the public key / certificate of the signing and encryption keys, as well as the URLs to the SingleSignOnService (SSO) and the SingleLogOutService (SLO) at the admidio installation. Furthermore, the first half of the XML contains the cryptographic signature of the XML, signed with the private key to prove that the metadata file actually comes from the admidio installation and not from some adversary.
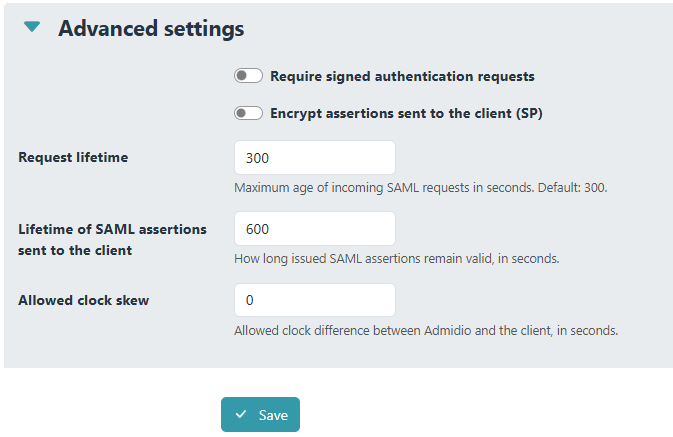
Advanced settings
 The SSO setup in Admidio aims to be as straightforward and painless as possible. For this reason, some advanced settings are not shown by default, but can still be configured in the “Advanced settings” are of the SAML preferences. Click on the small triangle to show or hide the advanced section.
- Key for signatures: Select the cryptographic key that will be used to cryptographically sign the messages to the Service Provider to prevent man-in-the-middle attacks
- Key for encryption: If the SP requires (or recommends) encrypting the messages, you can select a key for encryption, too. This can be (but does not have to be) the same key as for signatures.
- Select whether Admidio requires all SPs to sign their messages in turn. This requires each client to have a cryptographic key generated for itself, which some clients (e.g. DokuWiki) do not support. If a client does not provide a key, this setting has no effect and SSO will still work, but if the client supplies its own key, all requests must be signed by that key.
B. Configuring an App (Service Provider) to use SSO with Admidio
Once Admidio is set up to act as SAML 2.0 IdP, clients (Service Providers, “SP”) can Admidio as their login provider. Many systems support SAML 2.0 out of the box or with a plugin. The following settings are needed for setup. They are also available for copying at Admidio's SSO preferences page, as well as in the metadata xml.
- Metadata URL (optional; for automatic setup of clients): https://[YOUR_ADMIDIO_URL]/modules/sso/index.php/saml/metadata
- If your SP supports entering and loading the metadata XML, make sure to use it. It will load the correct settings from the SAML IdP and set up most settings correctly!
- IdP SAML Entity ID (unique identifier of the Admidio instance): https://[YOUR_ADMIDIO_URL]
- SSO Endpoint (where the SP sends the login request): https://[YOUR_ADMIDIO_URL]/modules/sso/index.php/saml/sso
- SLO Endpoint (where logout requests are sent to): https://[YOUR_ADMIDIO_URL]/modules/sso/index.php/saml/slo
- x509 Certificate (to allow clients to verify the cryptographic signatures): PEM-format needs to be copied out of the Admidio preferences
- User attribute mapping: Which SAML attributes returned with the login confirmation (“Assertion”) correspond to the login name, the full name, the email and possibly the user's group memberships in the SP system.
In addition each client typically has settings to require sent or received SAML messages to be signed and/or encrypted to ensure a secure login process. The details depend on the capabilities of the client. Some clients do not support encryption at all, other require all SAML messages to be signed (for good reason!). None of these settings are required, but the settings in the client and in Admidio must be consistent, i.e. if a client does not support encryption, Admidio must not require encryption.
Some clients also support Just-in-time user-provisioning (meaning users will be created on-the-fly the first time they are logged in), while others require all users to be presents before they can log in through SAML.
The details always depend on the particular client. We have extensively tested Admidio's SAML implementation with the following clients and provide detailed setup instructions for them. Other clients should work, too, if they properly implement SAML, and their configuration will be similar to the documented clients.





C. Configuring Admidio with the Service Provider
Once the client is set up to send authentication requests to Admidio, Admidio needs to be configured to respond to them. All SAML clients (Service Providers) are configured in the SSO Client Administration page, which can be reached from the SSO Preferences page (https://admidio.demo.open-tools.net/modules/preferences.php?panel=sso) from the SSO SAML preferences page.
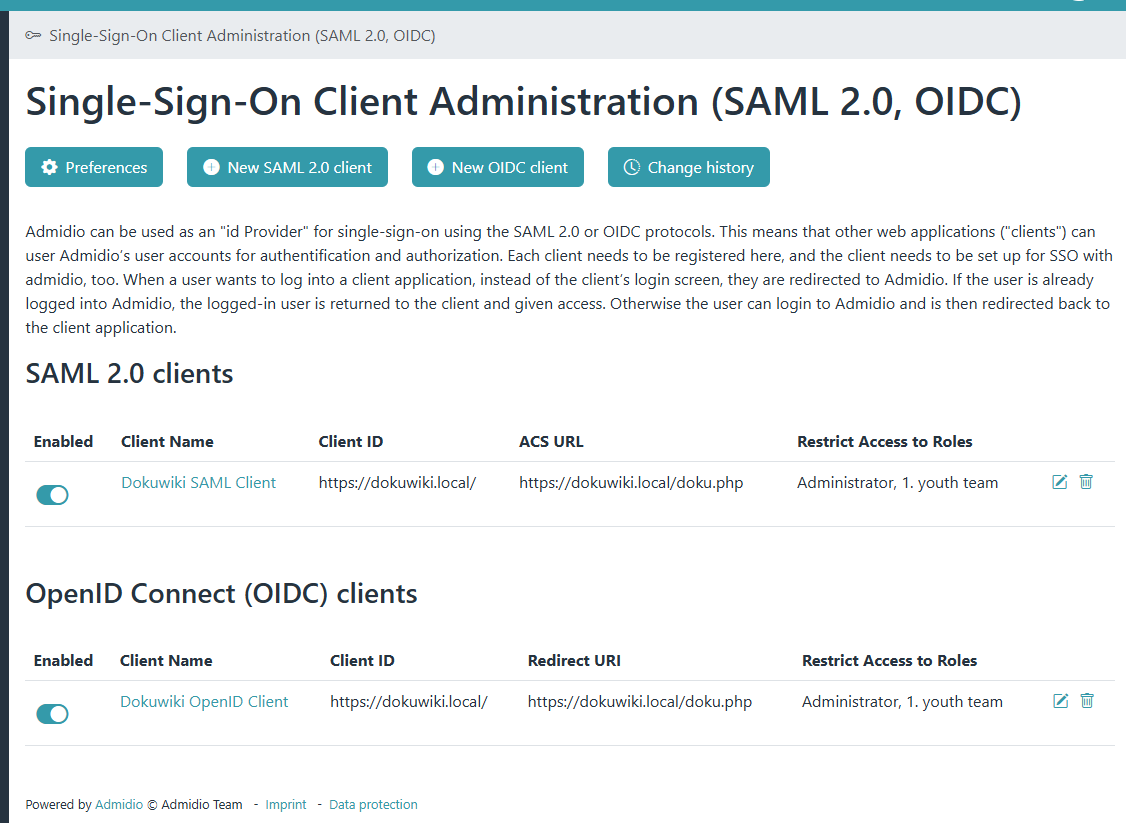
To ensure only legitimate login requests from the real client are processed, Admidio needs the entity ID, the URL for redirect as well as the x509 certificate (if messages are cryptographically signed). The following settings are needed for setup. They MUST be consistent with the settings configured in the SAML client (SP). Many SPs provide a Metadata XML link or file with all required settings included for automatic client setup. In Admidio's SAML client section, one can input the metadata URL and Admidio will pre-configure the client, but manual adjustments are possible (and in many areas even needed).
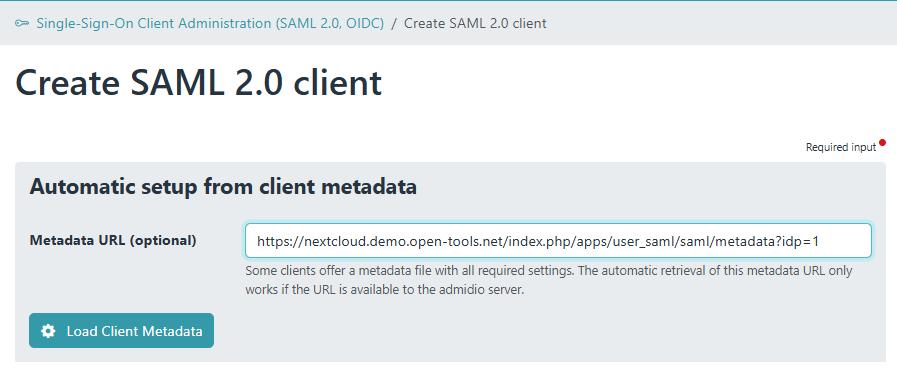
If your SAML client provides Metadata (URL or XML)
- Metadata URL (for automatic setup of clients):
- If your SP provides a metadata URL or the metadata xml, Admidio will load the correct settings from the SAML SP and set up most settings correctly!
- If the SP provides a metadata URL, paste it and load it. The URL will be stored and can be reloaded any time, in case the client changes its key or some other settings.

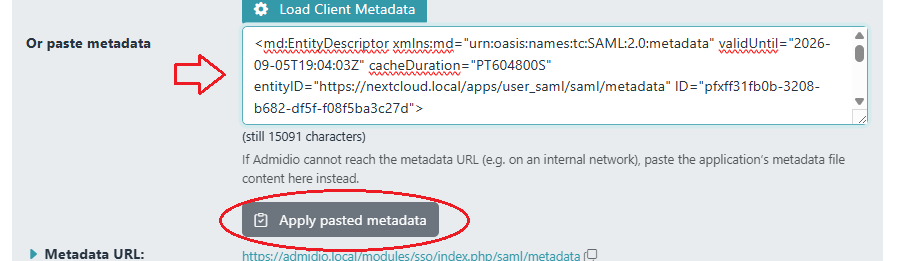
- If the SP provides the metadata in XML format without an URL reachable from admidio, paste the XML code into the input field to parse it. The XML will not be stored by Admidio and must be pasted again if the client changes settings.

If your SAML client does not provide metadata
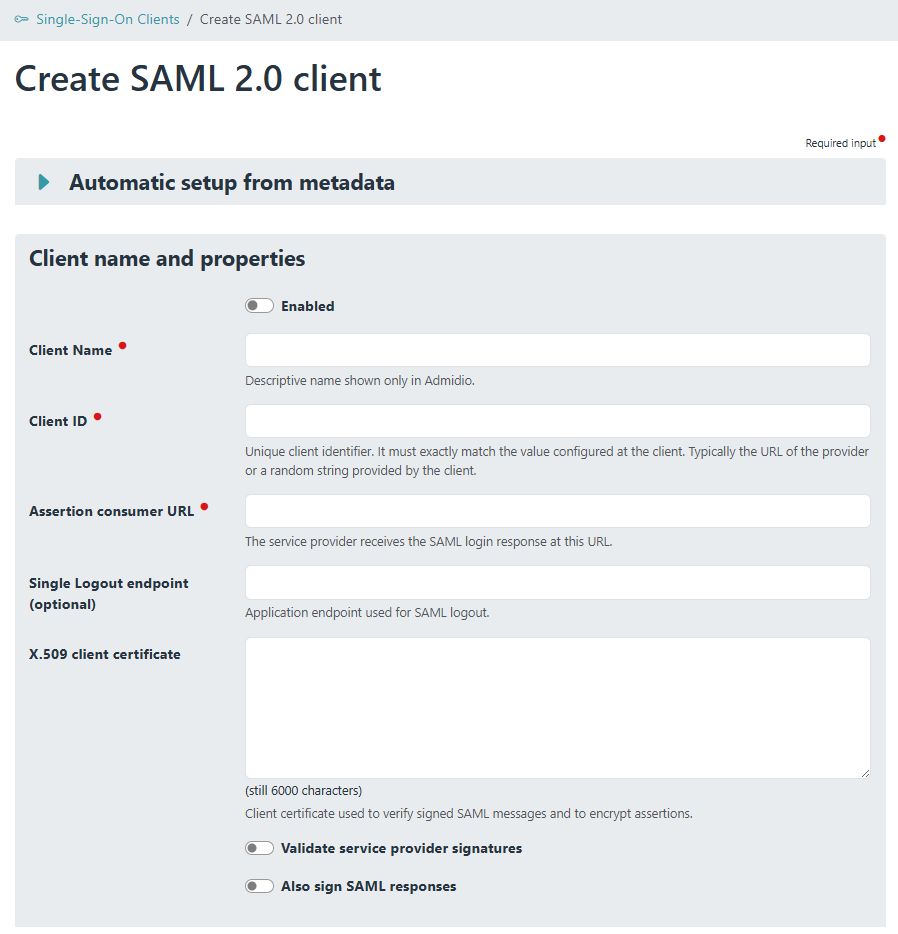
If your client application does not provide SAML configuration as metadata for automatic setup, you need to copy the following settings from the client into Admidio's client configuration:
- Client ID (unique identifier of the Client)
- ACS URL (where responses to login requests are sent to)
- Single-Log-Out URL (optional): Backchannel endpoint to log out from all clients
- x509 Certificate (to allow verification of the messages sent by the SP): PEM-format needs to be copied out from the client
Further configuration for all clients
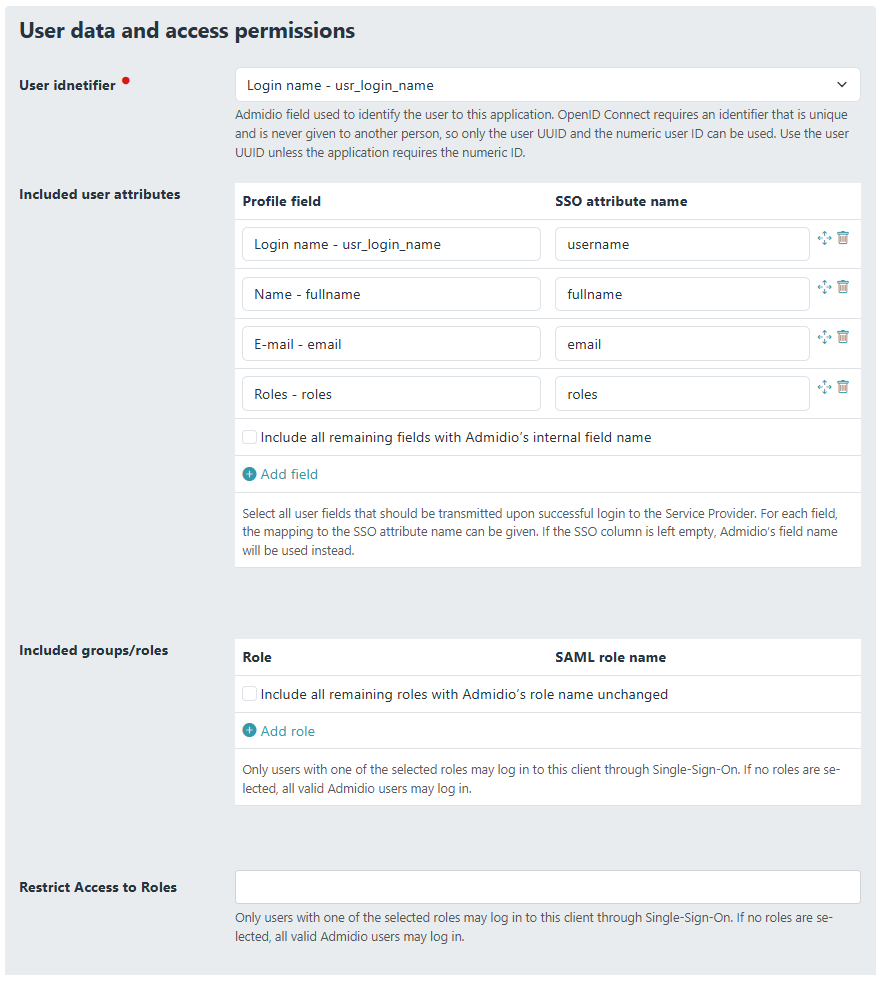
- User ID field: Whether the client gets the numeric Admidio user id or the globally unique UUID as a persistent identifier. This field is used internally and will never be visible to the user.
- Further profile data/fields transmitted to the client on successful login
- Which roles / group memberships are sent to the client on successful login. The data fields and groups can be mapped to different names, if the client cannot handle Admidio's fields and role names. On particular case is the admin role, where many clients use a role named “admin” to grant admin access to a user logged in via SAML.
In addition each client typically has settings to require sent or received SAML messages to be signed and/or encrypted to ensure a secure login process. The details depend on the capabilities of the client. Some clients do not support encryption, other require all SAML messages to be signed (for good reason!).
Setting up SSO via OpenID Connect (OIDC)
A. Basic Setup for Admidio as an OpenID Connect ID Provider
Admidio's general SSO configuration is done in the preferences (Tab “Sign in & Security”, section “Single-Sign-On”).

- First enable OIDC Single-Sign-On to show the OIDC-specific settings.
- The Issuer URL should typically be left empty, so the default URL of Admidio is used.
- Save
The SSO settings also provide an advanced section, where you can select or generate crypto keys for the signatures and encryption of the OIDC messages. A default key will be generated automatically.
The Preferences page also lists all the relevant URLs (endpoints) to set up the client as a Relying Party. If client supports automatic discovery, you can copy the discovery URL from this page and paste it in the client configuration. Use the “Copy” icon right of the URL. Otherwise you will have to copy the provided endpoint URLs to the client's config. Here is an example of such a discovery JSON:
{
  "issuer": "https://admidio.local/modules/sso/index.php/oidc",
  "authorization_endpoint": "https://admidio.local/modules/sso/index.php/oidc/authorize",
  "token_endpoint": "https://admidio.local/modules/sso/index.php/oidc/token",
  "userinfo_endpoint": "https://admidio.local/modules/sso/index.php/oidc/userinfo",
  "jwks_uri": "https://admidio.local/modules/sso/index.php/oidc/jwks",
  "introspection_endpoint": "https://admidio.local/modules/sso/index.php/oidc/introspect",
  "revocation_endpoint": "https://admidio.local/modules/sso/index.php/oidc/revoke",
  "end_session_endpoint": "https://admidio.local/modules/sso/index.php/oidc/logout",
  "frontchannel_logout_supported": true,
  "frontchannel_logout_session_supported": true,
  "backchannel_logout_supported": true,
  "backchannel_logout_session_supported": true,
  "scopes_supported": ["openid", "profile", "email", "address", "phone", "groups", "custom"],
  "response_types_supported": ["code"],
  "response_modes_supported": ["query"],
  "grant_types_supported": ["authorization_code", "refresh_token"],
  "code_challenge_methods_supported": ["S256"],
  "subject_types_supported": ["public"],
  "id_token_signing_alg_values_supported": ["RS256"],
  "token_endpoint_auth_methods_supported": ["client_secret_post", "client_secret_basic"],
  "introspection_endpoint_auth_methods_supported": ["client_secret_basic", "client_secret_post"],
  "revocation_endpoint_auth_methods_supported": ["client_secret_basic", "client_secret_post"],
  "claims_supported": [
    "sub", "iss", "aud", "exp", "iat", "auth_time", "nonce", "acr", "amr", "sid",
    "uuid", "preferred_username", "name", "family_name", "given_name", "email", "phone_number", "address",
    "groups", "locale", "website", "gender", "birthdate"
  ],
  "claims_parameter_supported": false,
  "request_parameter_supported": false,
  "request_uri_parameter_supported": false
}
In contrast to SAML, the metadata does not contain the public certificate. In OpenID, there is a separate endpoint (the “jwks_uri” in the discovery document) that provides the current key in “JSON Web Key Sets” (JWKS) format. Also notice that the discovery document lists all allowed scopes and technical details about the internal OpenID settings.
Admidio is now ready to provide single-sign-on functionality to Relying Parties.
Each RP first needs to be set up with the URLs to connect to Admidio. This can ideally be done by providing the RP with the discovery link. After that, Admidio needs to be configured to accept login requests from the RP. Unfortunately, OpenID Connect does not provide an automatic way to transfer configuration data from the RP to the IdP, so the client ID and the Redirect URL needs to be manually copied from the RP to Admidio's OpenID client settings. The details on where to find these depend on the actual client app.
B. Configuring an App (Relying Party) to use SSO with Admidio
Once Admidio is set up to act as OpenID Identity Provider, clients can be configured to use Admidio as their login provider. Many systems support OpenID Connect out of the box or with some plugin. The following settings are needed for setup. They are also available for copying at Admidio's SSO preferences page, as well as in the metadata json (from the discovery URL).
- Discovery URL (optional; for automatic setup of clients): https://[YOUR_ADMIDIO_URL]//modules/sso/index.php/oidc
- If your RP supports auto-configuration, make sure to use it. It will load the correct settings from the SAML IdP and set up most settings correctly!
- IdP Issuer (unique identifier of the Admidio instance): https://modules/sso/index.php/oidc
- Authorization Endpoint (where the RP sends the login request): https://[YOUR_ADMIDIO_URL]/modules/sso/index.php/saml/sso
- Token Endpoint (where the RP sends requests to convert an auth code to a token, i.e. an app-specific password replacement): https://[YOUR_ADMIDIO_URL]/modules/sso/index.php/saml/slo
- Userinfo Indpoint (where the RP can request details about the user):
- The (unique) Client ID and Client Secret must be entered identically in Admidio's client configuration and in the client. They serve as “password” to grant access to the client.
- Scopes (which groups of profile data are requested by the client): Any of openid (required), profile, address, phone, email, custom, groups, roles
- User attribute mapping: Which data fields (OpenID claims) returned by Admidio correspond to the login name, the full name, the email and possibly the user's group memberships in the RP system.
In addition each client typically has settings to for further customization. Also, some clients offer a setting that SAML login is only possible for users that are already manually created in the RP, while others offer a setting to automatically create user accounts on successful SAML login.
The details always depend on the particular client. We have extensively tested the following clients, but other OIDC clients should work as well. The configuration will be similar to the documented clients.
C. Configuring Admidio with the Relying Party
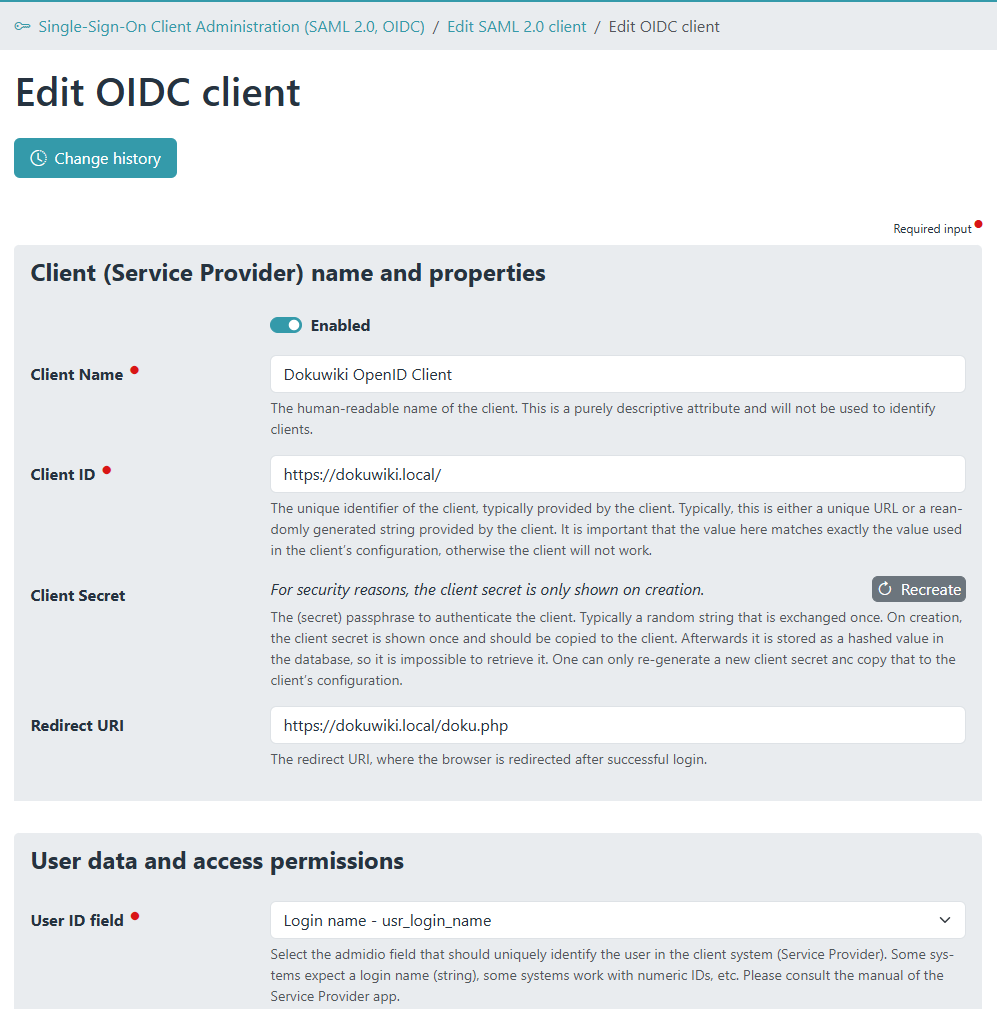
Once the client is set up to send authentication requests to Admidio, Admidio needs to be configured to respond to them. All OpenID clients (Relying Parties) are configured in the SSO Client Administration page, which can be reached from the SSO Preferences page (https://admidio.local/modules/preferences.php?panel=sso) from the SSO OIDC preferences page.
To ensure only legitimate login requests from the real client are processed, Admidio needs the entity ID and the Redirect URI. In addition, Admidio will generate a Client Secret (a random string) that needs to be copied to the client's configuration and acts as a client password. The following settings are needed for setup. They MUST be consistent with the settings configured in the OpenID Connect client (RP).
- Client ID (unique identifier of the client): typically the URL of the OpenID client (RP)4)
- Client Secret (basically the client's password to access Admidio): Admidio will create this secret when the RP is created and will store it only as a hash in the database. Make sure to copy the secret before saving, as it is not possible to retrieve it later! One can, however, simply recreate a new secret and paste that into the RP's configuration.
- Redirect URI (where the user is redirected after successful login). Many clients send an explicit URL where users are returned after a successful OIDC logout. To prevent security issues, only explicitly listed URLs are allowed. Multiple URLs can be given, one per line, and a * can be used as a placeholder (not allowed in the protocol or the domain name, only in the path after the domain). Some clients (like Wordpress) append variable options like the user's language. In that case, the placeholder should be used.
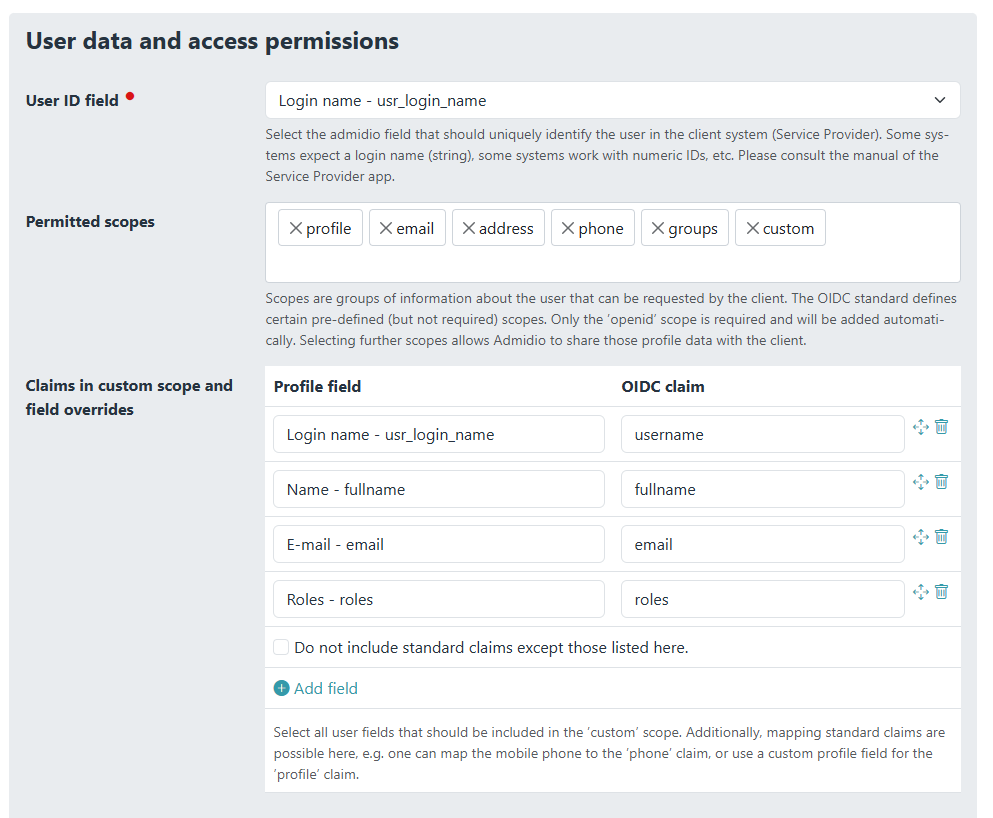
- User ID field: Whether the client gets the numeric Admidio user id, the globally unique UUID, or the user's login name as user ID to uniquely identify users. This is not the suggested login name in the client, but an internal identifier.
- Permitted scopes: OpenID defines certain groups of profile data, for which permission can be granted. The RP will include the scopes it is interested in in its login request, and the OpenID Provider (OP, Admidio in our case) will return the profile fields (“claims”) corresponding to those scopes, if permission is given. The “openid” scope MUST always be present in OpenID!
- Further profile data/fields transmitted to the client on successful login
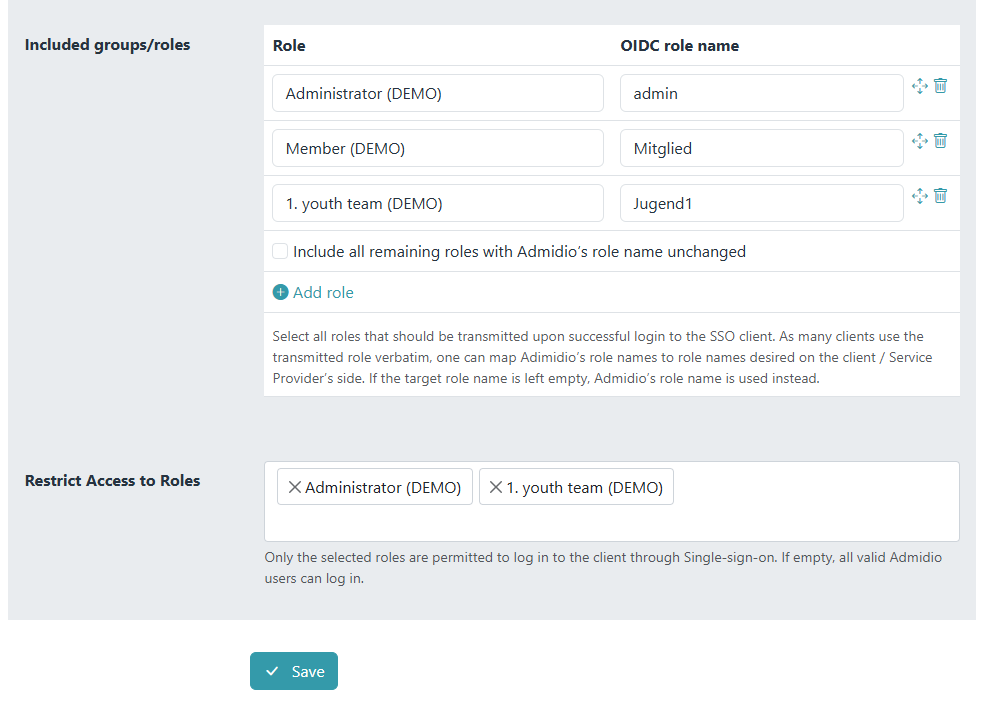
- Which roles / group memberships are sent to the client on successful login. The data fields and groups can be mapped to different names, if the client cannot handle Admidio's fields and role names. On particular case is the admin role, where many clients use a role named “admin” to grant admin access to a user logged in via OpenID.
In addition each client typically has some more settings regarding fields ⇔ claims mapping, groups, auto-generating accounts for new logins, etc. The details depend on the capabilities of the client.
Advanced Settings
Generating a Cryptographic Key for Signing and Encryption
- Both SAML 2.0 and OIDC use cryptographic keys to secure data transmission between Admidio and the client application. When first enabling SAML 2.0 or OIDC, Admidio automatically generated an RSA key with 2048 with default settings. Sometimes, manual key generation might be needed or desired:
- Replacing a cryptographic key periodically (“key rollover”) is a standard security technique, in case someone had undetected access to the private key.
- Some client might have special requirements on the key. Admidio's implementation follows the SAML 2.0 and OIDC standard, but some applications might require even higher security.
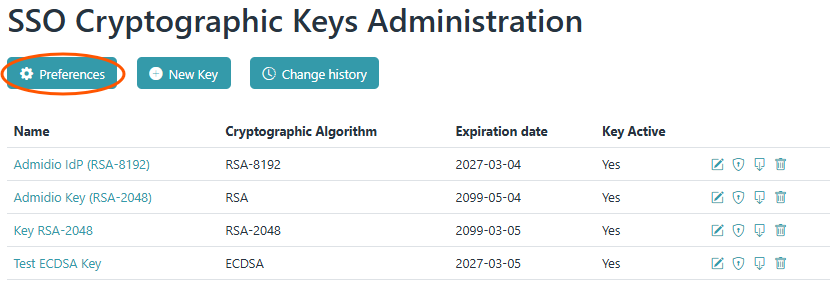
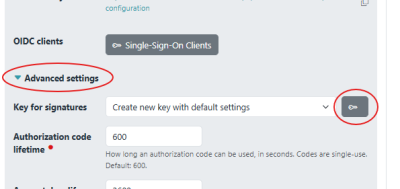 The advanced settings for OIDC and SAML 2.0 in the preferences page allow selecting a different key or generating a new key. The advanced settings are a closed section within the SAML / OIDC settings and offer a dropdown list to select an existing key for signatures. Additionally, the button to the right links to Admidio's cryptographic key administration.
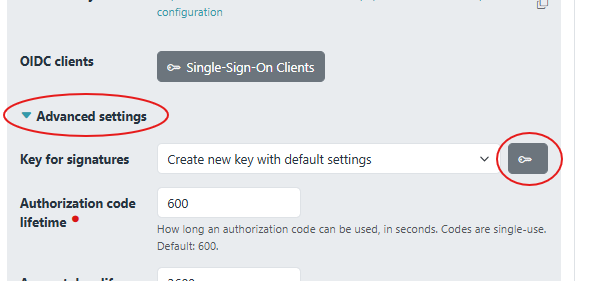
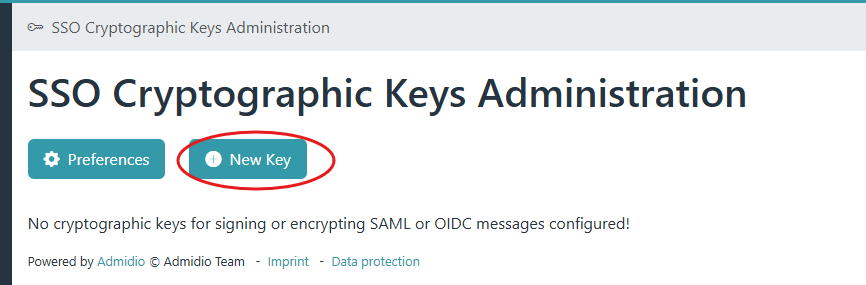
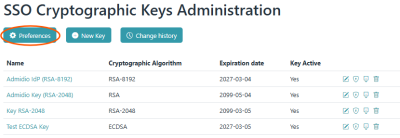
- At the “SSO Cryptographic Keys Administration” page, create a new key (typically RSA with 2048 bits).
- Also enter the URL of the Admidio installation as “Common Name”. The other required fields (Organisation, OU, city, etc.) must be filled, but their value is not relevant. Make sure that the expiration date is long enough! By default, an expiration of two years is suggested.
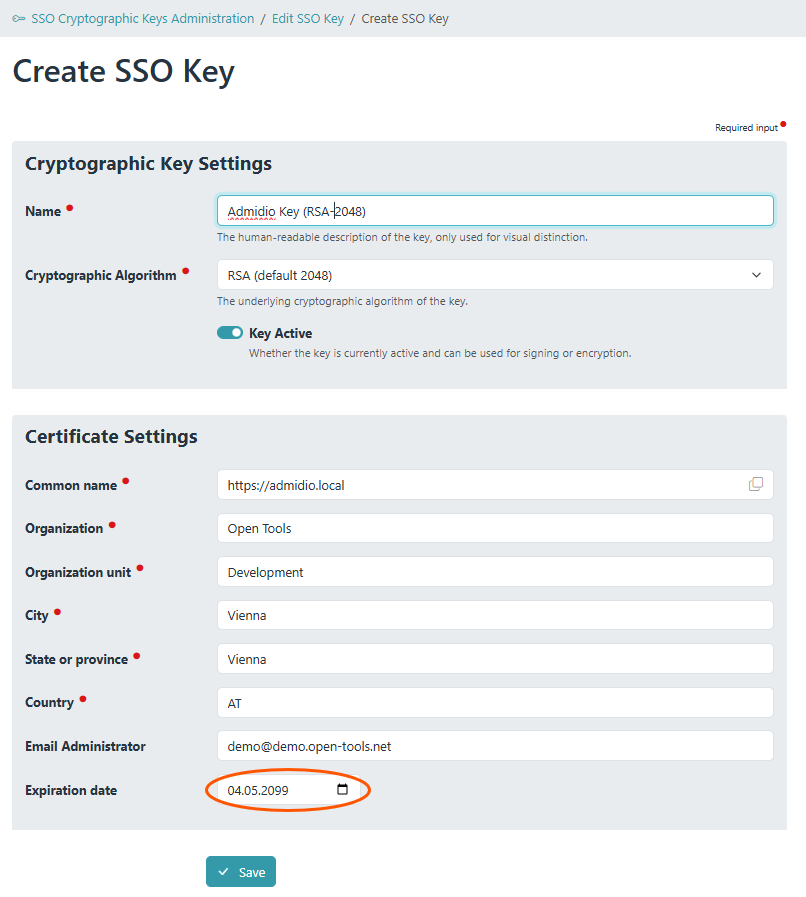
- The key should now be listed and activated. Return to the “Preferences” for further setup.
3)
There is an OpenID extension specification for dynamic/automatic client registration, but that has other complexities!
4)
Some RPs use basic auth by default, which does not allow special characters in the username. In this case, the URL MUST NOT be used, as this will prevent successful login! Other OpenID clients hardcode the client ID as their URL.